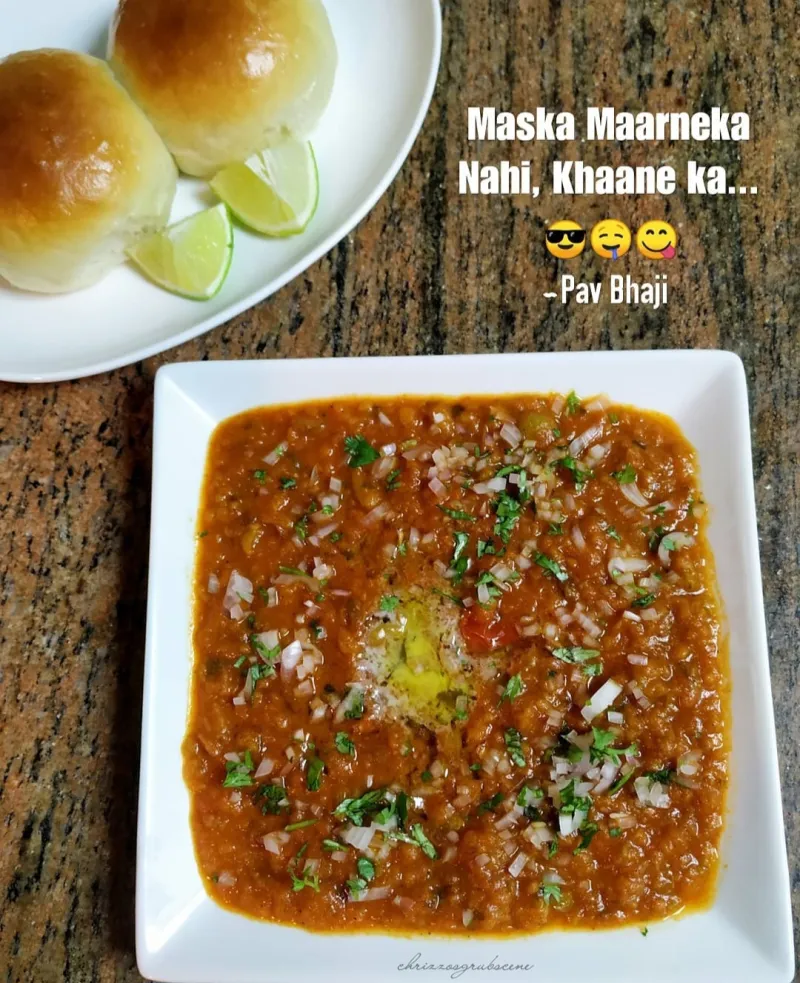
Recipe for Pav Bhaji & Everything that comes with it
PAV BHAJI for us Mumbaikars is an absolute emotion and for my family it has some very special memories, many stories and connections.Back in the day, whenever Mum would get extremely tired with work and just felt like having something else from the usual, it was always Pav Bhaji or Chinese. In those years, although there were some restaurants around our place, we never really went to the fancy ones. Most of our excitement of “eating out” involved Street Food. Those years were not like how it is now with the number of Multi-Cuisine fancy restaurants present at every corner of the street. We found Joy in the simple things of life, going to a kebab corner at Crawford market, Chinese food at the cart near the Dabul church, Mewaad Ice-cream outside Vijaywadi, Pani Puri next to the Elephant garden, Vada Pav at the Tadwadi naka and the delicious popular Pav Bhaji at Gazdar street naka.Where we lived earlier, in our lane, there was a person who used to own a Pav Bhaji cart(which by the way we never knew the whereabouts of)and he had rented out a place/kitchen next to our building where all his helpers would get together and begin their day by boiling many kgs of Potatoes, Veggies and Rice. The art they had of chopping sacks of Onions at such great speed could put any machine to shame.We have had Pav Bhaji at restaurants as well as at the carts and our most favourite Pav Bhaji used to be at Girgaum Chowpatty(since it was closer to home) and Juhu Chowpatty(whenever we used to go to visit Dad at his workplace in Sun n Sand Hotel…I know I know…leaving Sun n Sand and going to Chowpatty??? You may think….haha)that’s how much we love our street food.My Love for Pav Bhaji comes from my Mum. Till date, that stands as her only favourite Vegetarian dish. Even now, on days she doesn’t like to cook, she will always say “I’ll have Pav Bhaji” (Even as I am writing this article I just got to know that my Mum has ordered Pav Bhaji hahaha)I did my entire schooling at St. Anne’s Fort – Colaba. On the last day of our exams, all our friends would get some extra pocket money and we would all go to Sarkari Bhandar and enjoy their Deee-li-shassss Pav Bhaji with extra Pav!When making Pav Bhaji at home, the flavours and techniques are quite different, but emotion toh same to same hai Boss! And when making it in another country, that’s what takes it to the next level 😊My Mumma used to make Pav Bhaji quite often for my dabba too….Pav Bhaji se bohot lagav and pyaar hai boss …I’m not even kidding haha!Here’s how I make Pav Bhaji. Do give it a try. I’m sureyou’ll love it. I've also shared the recipes of everything that comes along with the Pav Bhaji - It's like a Full Gang :)
Ingredients
Instructions
In a cooker, Boil the Potatoes and Green Peas together ,using 2 Cups of Water and 1/2 Tspn Salt. If any water Once the cooker fully releases it's steam, open the cooker lid and with the help of a Masher, mash the Potatoes and Peas and keep asideSafety Tip: If it’s the first time that you’re using the cooker, please watch some videos before doing so incase you live alone or please ask somebody to show you how It has to be usedNote: You can boil the Potatoes and Peas even in a vessel if you don’t want to use a pressure cooker. Just that it will take more time. In a Wide Pan, heat 1 Tbspn Butter and Oil Add the Cumin seeds Add the Onion and Chopped Green Chillies and stir After about 3-5minutes, add in the diced Tomatoes, Ginger Garlic paste, some salt and 1 Tspn Kashmiri Chilly Powder and stir. You can cover the pan for the tomatoes to cook quickerNote: The salt helps the Tomatoes to naturally release water hence avoiding the tomatoes getting stuck to the bottom of the vessel. The Red chilly powder helps enhance the colour at this stage Once the skin on the tomatoes begin to crinkle, add the mashed potatoes and peas and with the help of a Potato masher, start mashing everything together.Note: You can add water little by little to mash all the ingredients together. DO NOT add all the water together or else it will get difficult to mash the ingredients Once everything is mashed, add the Pav Bhaji Masala, Lemon Juice, the remaining chilly powder, remaining Butter and mix/stir everything together. Check foe salt Note: Don't add all the PB masala at once. add some, stir, check. Some like it spicy, some like it mild so adjust the masala as per your preference. Same with the Lemon Juice. If the Tomatoes that you're using are nice and plump, then you may need lesser lemon juice. So check. Also, some PB masalas have salt in it plus we've added salt while boiling the potatoes, so go easy on the salt. You can always add more later. Now, lower the heat and let it boil for about 10-15 minutes or so. Add enough water or else the Pav Bhaji will dry out and get stuck to the bottom of the panNote: I suggest to allow the Pav Bhaji to cook a little longer so that the we don't get a raw bitter taste of the masala powder while eating After the Pav Bhaji is boiled well, add the Chopped Coriander and stir Add the 30gms of Butter to the boiling Pav Bhaji, Let it boil for 30 seconds and turn off the heat. Your delicious Pav Bhaji is tayyyyyar!!!
Want to see how it turns out?
We've hidden the final 3 steps to support the original creator. Get the full, complete instructions directly from their site!
Continue Reading at Chrizzosgrubscene →

Comments & Photos
Be the first to share your thoughts!
Did you make this recipe?
Leave a Comment